How to use NotebookLM: a beginner's guide
NotebookLM answers questions from documents you give it, with citations that point back to the exact passage. Here is how the three panels work, what to upload, and which features are worth your first hour.
NotebookLM was renamed Gemini Notebook in July 2026. This guide covers the same product under its new name — everything below still applies whether you know it as NotebookLM or Gemini Notebook.
Go to notebooklm.google.com, create a notebook, and add a few documents as sources. Ask questions in the middle Chat panel; every answer cites the exact passages it came from. The Studio panel on the right turns the same sources into study guides, podcasts, mind maps, flashcards and more.
The difference between NotebookLM and a normal chatbot is where the answers come from. ChatGPT answers from everything it absorbed in training. NotebookLM answers from the files you upload, and if the answer is not in them, it usually tells you so instead of improvising. That one design decision makes it useful for exactly the work where a chatbot is risky: your lecture notes, your contracts, your research papers, your meeting transcripts.
The three panels
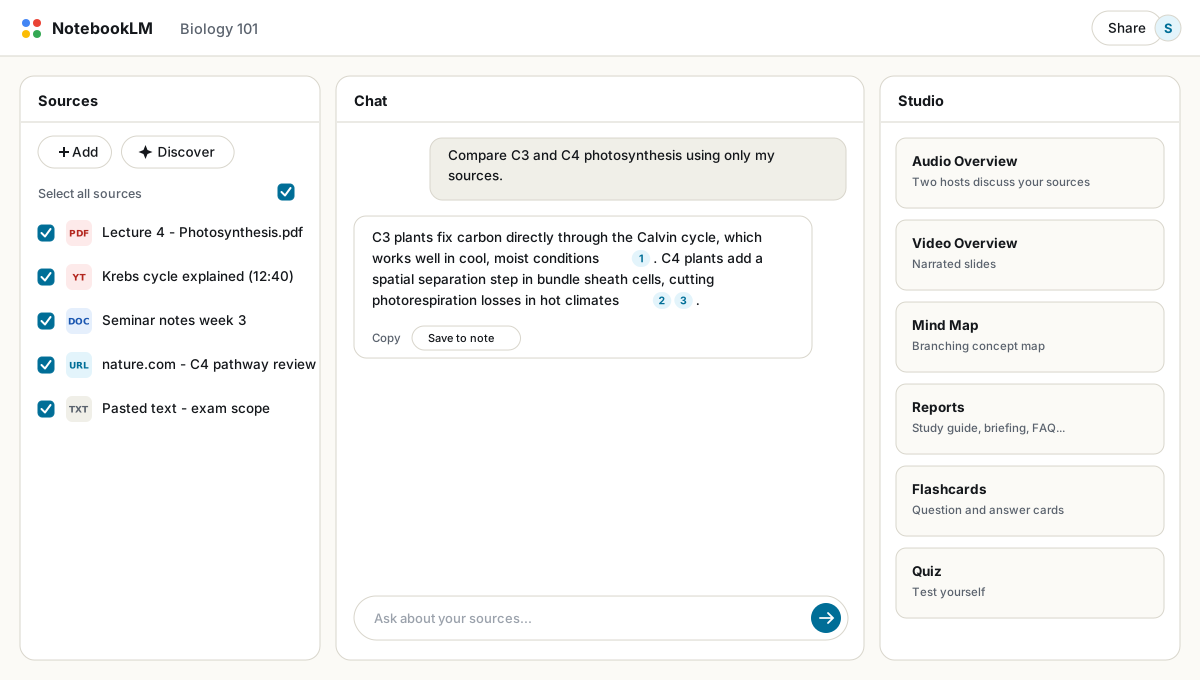
- Sources (left) holds the documents the notebook is allowed to read. Each source has a checkbox, so you can point a question at two files instead of twenty.
- Chat (middle) is where you ask questions. Answers carry small numbered citations; hover one to preview the passage, click it to jump into the source.
- Studio (right) generates things from your sources: Audio Overviews (a podcast-style discussion), Video Overviews, Mind Maps, reports like study guides and briefing docs, flashcards and quizzes.
Step 1: create a notebook and add sources
- Create a notebook. One notebook per project or course works far better than one giant notebook for everything. Mixed, unrelated sources produce vague answers.
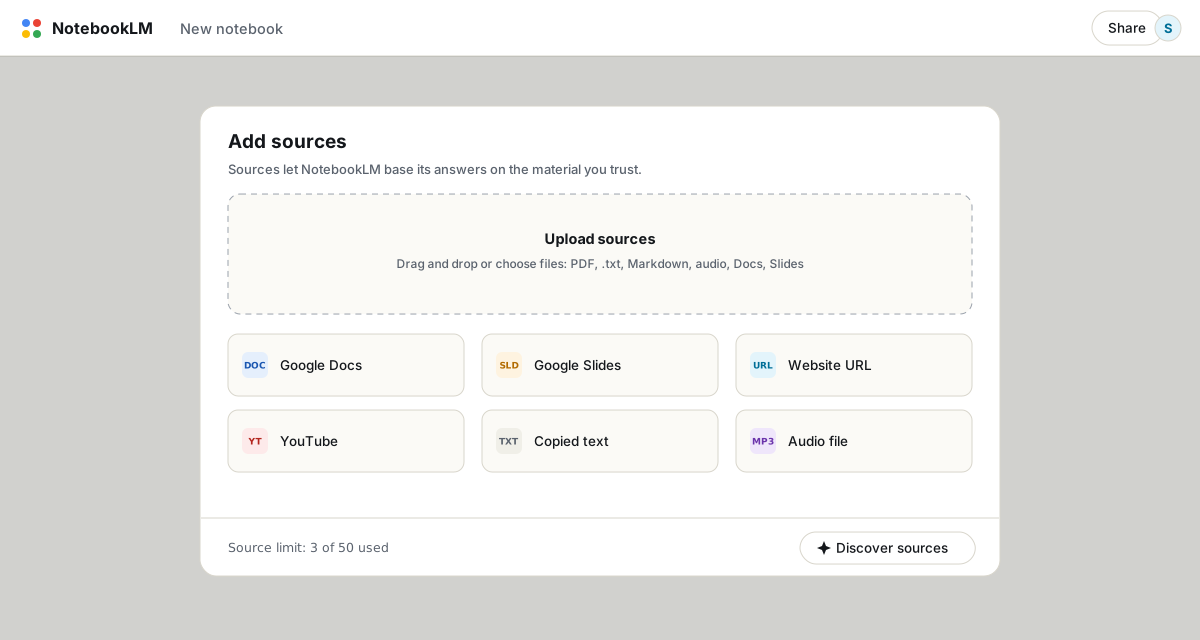
- Click Add in the Sources panel. You can upload PDFs, Word files, text, Markdown, slides and audio, pull in Google Docs and Slides, or paste a website or YouTube link.
- Give sources real names. Rename
document(3).pdfto something likeLecture 4 - Photosynthesis. Source names feed into mind maps and reports, and you will be choosing between checkboxes by name later. - Mind the limits. A free account allows 50 sources per notebook and up to 500,000 words per source. That is a lot of reading material.
Step 2: ask questions in chat
Start with a broad question like "What are the main themes across these sources?" and then get specific. The citations are the feature to learn here: each numbered chip anchors a claim to a passage. Click a few early on. It builds a feel for when the model is on solid ground and when it is stretching, which matters more than any prompt trick.
Two chat habits pay off immediately. First, use the checkboxes: untick everything except the two sources you actually want compared, and the answer sharpens noticeably. Second, when an answer is good, click Save to note. Notes live in the notebook permanently, and you can later convert them into sources themselves.
Step 3: generate something in Studio
Studio is where NotebookLM stops being a search box and starts producing artifacts. The Audio Overview gets the attention, and deservedly so: two AI hosts discuss your sources for ten to twenty minutes, and the result is listenable in a way that text summaries are not. But the quieter tools earn their keep too. A study guide gives you key terms and questions. A briefing doc compresses everything to one page. Flashcards and quizzes come with an Explain button that cites the source behind each answer.
Everything Studio makes is grounded in your sources, and most of it can be downloaded or exported. For anything you want to keep outside Google, see our guide to exporting NotebookLM to PDF.
What NotebookLM will not do
- It will not browse the web during chat. Answers come from your sources only, unless you use Deep Research to import web material first.
- It will not talk across notebooks. Each notebook is a silo, which is why focused notebooks beat one giant archive.
- It is not immune to mistakes. Citations occasionally point at passages that only loosely support a claim, so check them before you reuse an answer somewhere that matters.
Is it free?
Yes, and the free tier is generous: 100 notebooks, 50 sources each, 50 chat messages and 3 Audio Overviews per day. Paid tiers raise those numbers considerably; the free vs paid comparison has the full table. Most people never hit the free limits.
FAQ
What is NotebookLM used for?
Research and study over your own documents: ask questions with citations, then generate study guides, podcasts, mind maps, flashcards and quizzes from the same sources.
Is NotebookLM free to use?
Yes. The free tier includes 100 notebooks with 50 sources each, 50 chat messages per day and 3 Audio Overviews per day. Paid Google AI plans raise the limits.
Does NotebookLM use my data for training?
Google states that content uploaded to NotebookLM is not used to train its models. Workspace and Education accounts get additional enterprise-grade data protection.
Can I export what NotebookLM produces?
Partially. Some reports export to Google Docs, but chats and many outputs have no built-in export. The free NotebookLM to PDF extension saves any chat, note or report as PDF, Word or Markdown.
Is NotebookLM the same as Gemini Notebook?
Yes. Google renamed NotebookLM to Gemini Notebook in July 2026 — it's the same product, same features, just a new name.
Exporteer je NotebookLM in één klik
Gratis Chrome-extensie. PDF, Word en Markdown. Gerenderd op je eigen computer — er wordt niets geüpload.